Starting Seeds Indoors Under Lights
By Pat Dickey, Fairfax Master Gardener
One of my most enjoyable winter activities as a vegetable gardener is browsing through interesting seed catalogs, learning about many exotic and colorful varieties, and visualizing them in my garden. I decided a few years ago to go one step further and start many of these vegetable plants indoors under grow lights. By growing your own vegetables from seed, you will be better able to grow what fits into your gardening space. You will also feel empowered that you nurtured your vegetables from the beginning. Here are some guidelines for setting up your own grow-light system and growing your own transplants.
Equipment needs

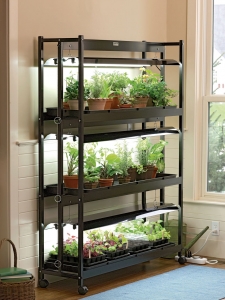
3 shelf grow lights
- Light is not necessary for initial germination. A heat mat beneath the containers or a warm place in your home will shorten the time for seeds to sprout.
- Grow-light fluorescent bulbs (T5 type) are best for the light source. The bulbs need to be hung so that they can be adjusted up and down for plant growth. Window light is not intense enough in late winter and spring and will result in spindly, weak plants.
- Containers for your seedlings can be store-bought, 2-inch plastic pots or seed-starting kits with plastic, domed tops. You can also use recycled cell packs from last year’s annuals or small yogurt containers. The important feature is that they have a hole in the bottom for drainage. You will also need 3-inch containers when the transplants grow larger. All the containers should first be sterilized with a one-part bleach/nine-parts water solution so that diseases and bacteria will not be transmitted to the new seedlings.
- Craft sticks or labels are useful for marking the types of seeds in each pot along with the initial planting date. Continue to label the plants after they are transplanted, since it is easy to mix them up, especially if you have several varieties of the same vegetable.
- Large waterproof trays are best for supporting your growing seedlings. Capillary mats that draw up water like a sponge are useful inside of the trays, so that you can water the plants at their root systems. The mats also help to disperse water gradually as the plants need more moisture.
- A power-strip timer is helpful for regulating the lights. Your plants will need 16 hours of light and 8 hours of darkness after your seeds sprout.
Planting mixes
Your seeds should first be planted in seed starter or germinating mix. After the seedlings outgrow their initial starter systems or pots, you will replant them into larger pots using a transplant mix. Neither of the mixes is soil, consisting instead of peat moss, perlite, vermiculite, coconut coir, limestone and other wetting agents and composts. Check the bags for a list of ingredients. Some of the germinating mixes also come with organic nutrients that serve as fertilizer for the first six to eight weeks.
Setting up a schedule
Here is a list of vegetables that can be started under lights and the approximate time before they will be ready for your garden planting. Plan your garden area on graph paper to determine how many plants you will need to start. Always plant extras in case some of the plants do not survive or show signs of weakness or deformity. Not all the seeds will germinate. Check the back of your seed packets for other useful information, including planting depth of seeds, days to emerge, and garden spacing.
- Onion seeds/leeks: Start seeds in cell packs or a large flat in early February, eight to 10 weeks before planting in April. Plant in garden when transplants are pencil size.
- Cabbage: Start seeds in early February, four to six weeks before planting in March, or when soil can be worked. Can also be started inside in late June as a fall crop.
- Peppers, eggplants, tomatoes: Start seeds at end of February, eight to 10 weeks before planting outdoors in May. Tomato seeds can wait to be started in early to mid-March; otherwise their height may quickly outgrow their space in the grow-light stand. Plant in garden after all danger of frost, when soil is warm, and night temperatures are mild.
- Cauliflower, broccoli: Start seeds in early March, four to six weeks before planting in April. Can also be started inside in late June as a fall crop.
- Leafy, green vegetables, such as kale and lettuce: Start seeds in early March, three to four weeks before planting in late March or early April, when soil can be worked. Can also be started inside in late July as a fall crop.
Planting your seeds
Moisten seed-starting or germinating mix in a bucket, beginning with small amounts from the bag. Fill each cell or container to within half an inch from the top. Pat mix firmly, and then plant two or three seeds in each. Cover the seeds with a quarter-inch of the mix. Using a mister, gently moisten the top surface. Then cover the planted container with a plastic dome or plastic wrap. Place your planted seeds in a warm area free of drafts. If you wish, use heat mats at a low setting underneath the containers to quicken germination. Remember that light is not necessary during this time. Don’t forget to mark your seeds with the vegetable, variety and planting date. Check to see that seeds are still moist each day and mist as needed. Remove dome or plastic wrap when seeds have sprouted. They are now ready for their new home under the grow lights.

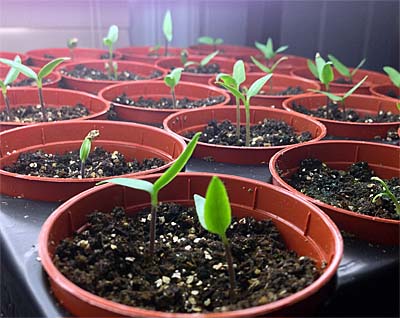
Seedlings with initial leaves (cotyledons) after germination
Place your sprouted seeds in their containers inside of the waterproof trays in your light stand. Position the capillary mats, if you are using them, under the containers in the trays. Plug in the power-strip timer and your T5 grow lights and set them so that your plants receive 16 hours of light and eight hours of darkness. Lower the lights to within 2 to 3 inches of the sprouted seeds. This distance should be maintained until the seedlings grow into transplants and move to your garden. Water the plants from the bottom by adding water to the trays. The mix in the containers will lighten in color as evaporation takes place to let you know when more water is needed. If your plants are situated where there is not much air circulating, you may want to run a small fan in the area. This will help to strengthen the plants.

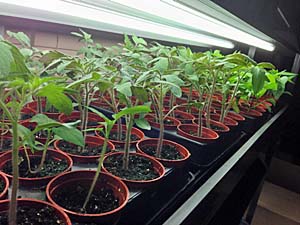
Young tomato plants
Your plants will first grow to form their two seed leaves or cotyledons. Cotyledons are more rounded and will drop off eventually. Then they will form their true leaves, which will look more like the mature leaves. Once the seedlings develop their true leaves, it is now time to consider fertilizing them. Check to see whether fertilizer is already in the mix you are using. If it isn’t, dilute a fertilizer developed especially for seedlings to less than half strength, and apply it into the trays for bottom watering. Be careful not to overwater. A green, algae-like coating may grow on the top of the containers, which is a sign of too much water. Allow the seedlings to dry out more before watering again.
As the seedlings become transplants, growing taller and extending their roots out of the drainage holes, keep repotting them into larger containers.
Caring for transplants and hardening off
Continue to provide 16 hours of light and eight hours of darkness to your transplants. Turn them periodically to keep their stems upright. Also, continue to bottom water your transplants, keeping all water off of their foliage. Fertilizer needs will be minimal because of all the nutrients in the mix. If the plants look pale in color or haven’t grown as expected, fertilize with a diluted solution of 6-12-6 fertilizer. Fertilizer that has a high concentration of nitrogen may result in lush foliage, but less harvest.
When your transplants are nearly ready to plant in the garden, it is time to harden them off. They need to be exposed to sun and outside breezes gradually before being planted in your garden. This process takes seven to 10 days. On the first day, set trays outside in a protected area for two to three hours, such as in the shade of a building or beneath a large tree. Each day, gradually increase the amount of sun and breeze until you are leaving the plants outside overnight. Protect them from rain and harsh wind. Water your transplants less, so they will transition to the conditions of the garden more easily. When you finally plant your transplants into your garden, fertilize them with a weak solution and water them thoroughly. Water them at the root system to prevent fungus and other diseases. Protect plants with a floating row cover during their first weeks there. They will still receive sun and water through the cover.
Follow these steps and your reward this summer will be a mature vegetable garden you have nurtured yourself, from seed to harvest.
Resources
Starting Plants Indoors From Seeds, University of Missouri Extension
Lighting Indoor Houseplants, University of Missouri Extension
Growing plants indoors under supplemental lighting, Kent Kobayashi, University of Hawaii at Manoa