The Hand Tied Bouquet — Florist-Perfect Garden Flowers
By Elizabeth Cornell Fake, Fairfax Master Gardener
 In the next few weeks there will be a profusion of garden flowers perfect for cutting and arranging into table bouquets. The hand tied bouquet technique is an easy solution for flower arrangement that anyone can perfect with a little practice. The hand tied technique creates tiers of flowers cascading down from a central core. Then, cutting the stems to the same length holds the gradation of blooms in place for a proportioned arrangement. Here are some guidelines to get started:
Choose a variety of flowers and foliage for the bouquet. Pick some large flowers as focal flowers, smaller flowers as filler flowers and one or two types of greenery for accent foliage.
Begin with an appropriate container for the flowers. Allow plenty of room for water and conditioning solution. Think about the design of the container to provide a contrast showing the flowers to their best advantage. If you have showy flowers like hydrangeas, you will want to use a plain container, and if you have elegant flowers like lilies, feel free to use a more decorative container.
Establish the proper proportion for the bouquet. Measure the opening of the container and its height using a metal household tape measure. Add the two numbers together to determine the height of your tallest flower in the bouquet. For example, if the vase opening is 5 inches and the height of the container is 14 inches, your center flower should be 19 inches tall.

Building the Bouquet Core
Secure the bouquet with florist tape or string. At this point you may want to use some florist tape or string around the stems to secure the bouquet before adding more bulk. Depending on the number of flowers you have and the size of the container, continue adding tiers to the bouquet.

Cut the same length and on a slant
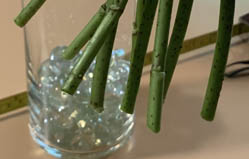
Move bouquet into container. Fill the container with water before moving the bouquet into it. To give the flowers a secure base, fill the bottom of the container with rocks or marbles to hold the flowers aloft. Carefully move the bouquet to the vase, allowing the stems to rest on the bottom of the container.
 Consider a presentation bouquet. If you have aspiring ballerinas, musicians or graduates to fete, take them a bouquet of your own garden flowers to celebrate. Using the same technique for establishing the center flower and building tiers, begin with laying the foliage flat as the first layer. Add the central flower slightly below the top of the foliage and then angle flower tiers down from the central blossom. Cut all stems to the length of the central flower. Secure stems with floral tape at the top of the bouquet before wrapping in tissue paper for presentation. Add a simple ribbon bow to hold the paper in place.