From Pathway to Passageway
Part 2: Construction
By Elizabeth Cornell Fake, Fairfax Master Gardener
 Your muddy little path will be a memory in just a few days after you construct a sturdy passageway to take its place. To recap: you have decided on a design and size for the walkway, consulted with a garden center for appropriate materials and have drawn the project to scale. Now you are ready to lift the shovel and get started.
Not so fast… There are a few more things to think about. Although this is a do-it-yourself project, you may want to confer with some experts before you begin. Even so, here are some steps you can try out before you contact your experts.
- The path should be level to ensure safety and ease of transit. If the area where you plan to construct your path is bumpy or hilly, you will first want to flatten it out or think about some type of steps. An expert can show you how to add leveling sand to correct this problem.
- Drainage is always a consideration. Consult with an experienced landscaper about how water will properly drain off the surface. Experts may suggest installing the path ¼ to ½ inch above the nearby surfaces. For heavy clay soil like we have in Virginia, you may need to improve drainage by installing perforated 4” plastic tubing under the path that leads to a drywell or empties into an area downhill. Be sure to cover it with landscape fabric to prevent soil from entering the tube and clogging it up.
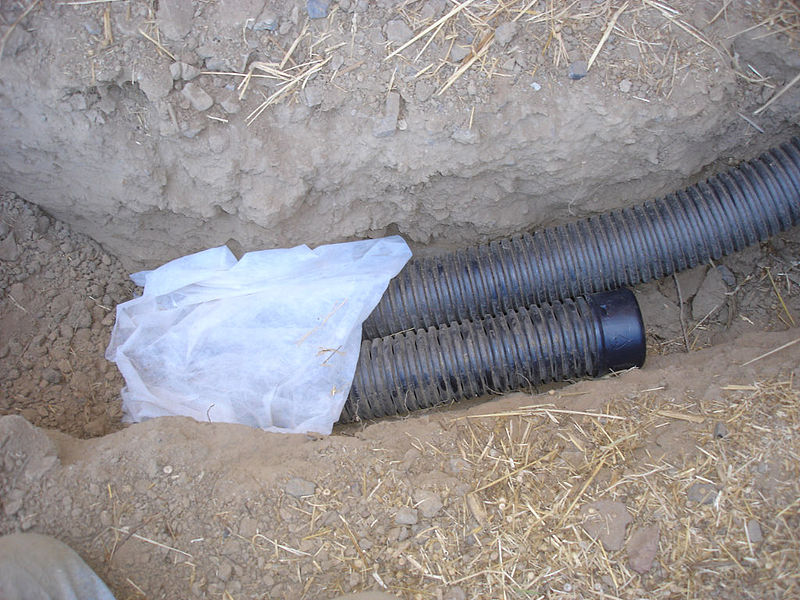
French drain with piping and fabric
- It’s never too early to think about lighting. The ambitious builder can install an electrical conduit at base level to add illumination immediately or later. An electrician can offer you some assistance with this. Consider low voltage lighting for safety. Energy-saving LED light fixtures are now available for low voltage lighting systems, but remember that all low voltage will require installation of a transformer.
Now, here comes the best part, building the passageway. Instructions for a simple gravel path are given below. Refer to the Resources listed at the end to clarify directions.
- Prepare the bed for the path. With a rope or hose, lay out the design for the entire length of the path on one side. Using a spacer gauge (made from a 2 x 4) that is slightly wider than the path, mark off the desired width at 2- to 3-foot intervals and mark with string. Use a second hose or rope to set the other side of the path.
- Remove grass, sod or topical cover in the walkway area. This is a good place to use a rented sod cutter to make this job quick and easy. Clear area to a depth of 4 to 6 inches.
- Lay landscaping fabric over entire area. Cover the area from side to side, allowing extra fabric to cover unexcavated areas. This helps keep weeds from growing through the gravel.
- Install edging if desired. Hammer rubber edging over fabric, if desired, into both sides of the path. Edging can help keep the stones in their place.
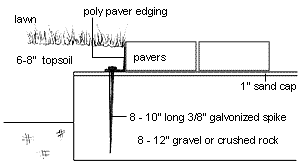
Paving edge
- Trim extra fabric and backfill dirt behind edges.
- Add a 2-inch to 4-inch layer of base pathway gravel. Rake over entire length of the path. Gravel gives the area a level consistent support and helps with drainage.
- Add another 1 inch of surface gravel. Rake over entire length of the path.
- Tamp down the base and surface gravel. This is a good place to use a rented plate compactor.
- Fill path with remaining surface gravel. Smooth with a 2 x 4 to ensure an even surface.
- Tamp surface again. Compact gravel to level slightly below surface of edging to secure pathway.
- Spray with hose. Wash off dust and dirt to bring out color of gravel.
- Enjoy your clean shoes!
Resources
The Complete Book of Patios & Walkways, Creative Publishing International
Here’s How to Build a Perfect Path, Lynn Ocone, This Old House
How to Lay a Gravel Pathway, DIY Network